In the bustling digital landscape of today, where every task demands efficiency and finesse, having the right tools at your fingertips can make all the difference. Among the array of applications nestled within your device lies one gem: Apple Notes. Constantly evolving and reaching new heights of sophistication, Apple has transformed Notes into a powerhouse of productivity and creativity. This blog is dedicated to those seeking to harness the full potential of their devices, to master the art of note-taking, and to elevate their productivity to unparalleled levels.Whether you’re a seasoned Notes user or just dipping your toes into its vast capabilities, this blog is your guide to unlocking its hidden treasures. Apple’s relentless pursuit of innovation has endowed Notes with an arsenal of features designed to streamline your workflow, organise your thoughts, and amplify your productivity. From seasoned professionals to eager beginners, this blog is your companion on the journey to mastery.So, join us as we embark on a journey through the labyrinth of Apple Notes, uncovering its latest tips, tricks, and features implemented by Apple. Prepare to be amazed, for within these digital pages lie the secrets to transforming your work and making your tasks infinitely easier. Let’s dive in and explore the boundless possibilities that await within the realm of Apple Notes.
Checklist
Notes isn’t just a place for jotting down thoughts—it’s your ultimate productivity hub. With the checklist feature, you can transform your notes into dynamic to-do lists, keeping you on track and organised like never before.To create a checklist, simply open a note and tap the checkmark icon. Watch as a circle appears, ready for your first task. Type your entry, hit Return, and voila—a new circle materializes for your next task. Need to break down a task into smaller steps? Swipe any entry to the right and watch it transform into a sub-item.As you tackle your tasks, tap the circle next to each completed item to mark it off. Apple Notes even offers to automatically move completed tasks to the bottom of the list, keeping your active tasks front and center for maximum efficiency.
Quick View of how to create checklist:
Launch the Notes app on your device.

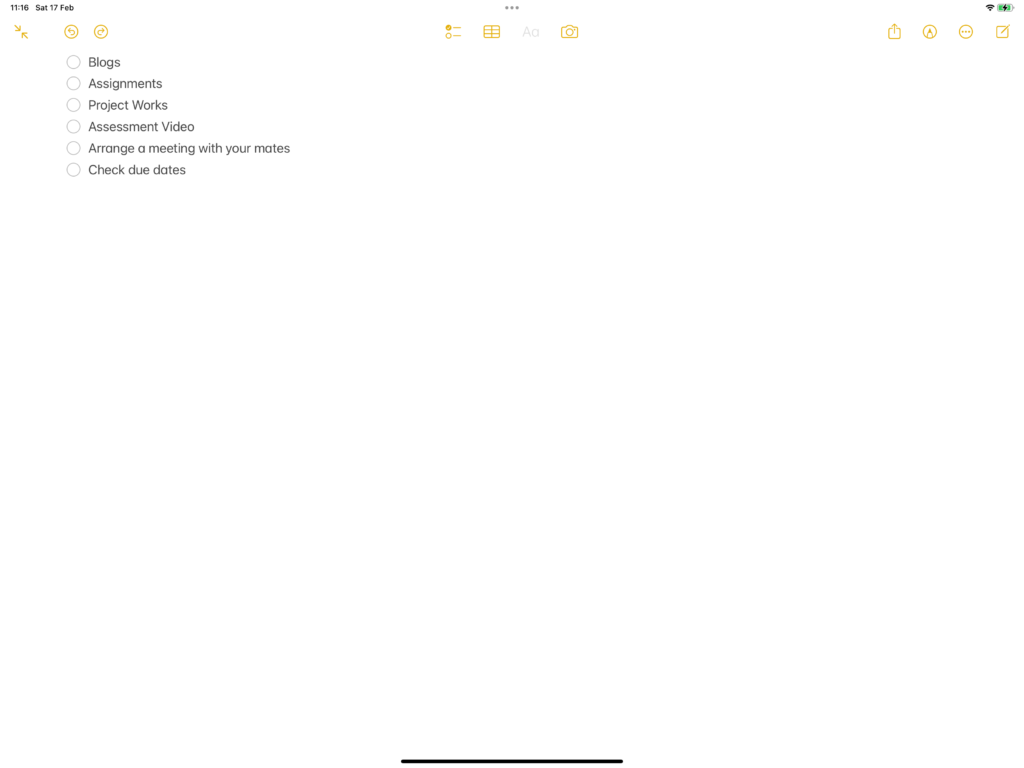
Tap the checkmark icon located in the toolbar. This will create an unfilled circle, indicating a task or item that needs to be completed.
As an example, I am entering my university-related works, pressing the return key after each item to create a new line and continue adding more tasks. Repeat this step until your list is complete.

Once you have finished entering all the items, tap the “Done” button to save your list.
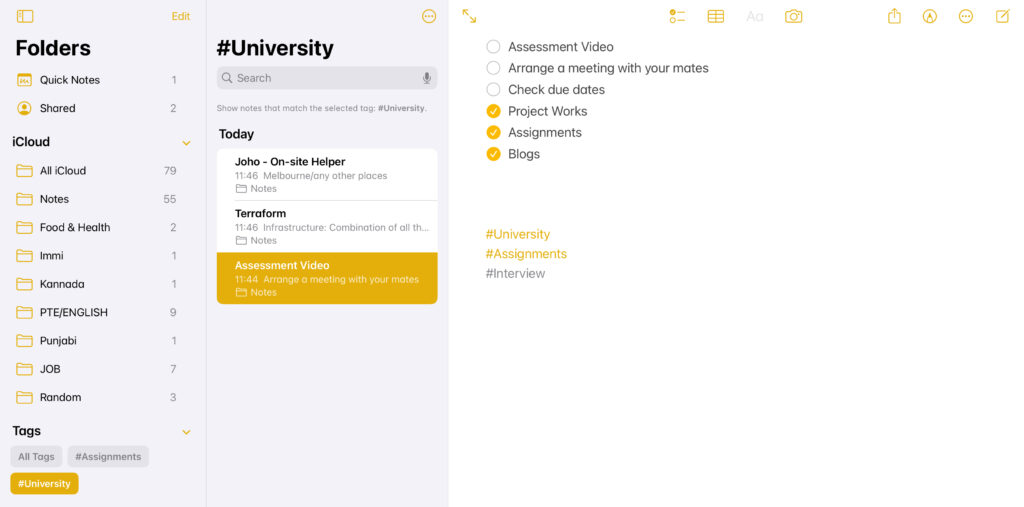
When you tap on an item in your list to mark it as completed, the circle will automatically fill with an orange checkmark, indicating that the task has been finished. Additionally, the completed task will be moved to the bottom of the list, ensuring that any remaining or unfinished tasks remain at the top for better visibility and prioritisation.

With Apple Notes, managing your to-do list has never been easier. Stay organised, focused, and productive—all with the power of a simple checkmark. But, wait!
Tags
Tags in Apple Notes are a valuable organizational tool that can greatly enhance your note-taking experience. By assigning tags to your notes, you can effectively categorize and group related information, making it easier to locate and manage your content.
The primary benefit of using tags is that they provide a flexible and customizable way to organize your notes. Unlike traditional folder-based systems, tags allow you to assign multiple labels to a single note, allowing for more nuanced categorization. This means that a single note can belong to multiple tags simultaneously, enabling cross-referencing and creating dynamic connections between different topics or themes. Tags also facilitate efficient searching and filtering. When you assign tags to your notes, you can quickly locate specific information by searching for a particular tag. This saves time and effort that would otherwise be spent scrolling through numerous notes or folders.
Additionally, you can combine multiple tags in a search query to narrow down your results further, enabling fine-grained retrieval of information. Furthermore, tags offer a level of personalization to your note-taking system. You can create tags that align with your own workflow, interests, or projects, making it easier to navigate and organize your notes in a way that suits your specific needs. Whether you’re a student organizing study materials, a professional managing projects, or an individual keeping track of personal tasks, tags provide a versatile framework for efficient organization.
Quick View of how to create tags:
Open the Notes app on your Apple device & create a note.
Type a pound sign (#) followed by a keyword or phrase to create a tag within the note.
Continue adding tags by typing pound signs followed by keywords or phrases in all the related notes.

Tap “Done” to save the note with the assigned tags.
In the Notes list view, tap the Tags button at the bottom to view all created tags.

In summary, tags in Apple Notes are a powerful organizational feature that allows for flexible categorization, streamlined searching, and personalized note management. By leveraging tags effectively, you can enhance productivity, improve information retrieval, and create a more organized and efficient note-taking system.
Linking Notes
Linking notes in Apple Notes is a powerful feature that allows you to establish connections between different notes, enabling easy navigation and reference to related information. It provides a way to create a network of interconnected ideas and enhance the organization and accessibility of your notes.
When you link notes, you essentially create hyperlinks within your notes. These hyperlinks are represented by underlined and blue-colored anchor text, indicating that they are clickable links. By tapping on the anchor text, you can quickly navigate to the linked note, providing a seamless way to access additional information or related content.
This feature is particularly valuable when you have a large collection of notes or when you want to establish relationships between different topics, projects, or ideas. For example, if you’re working on a research project, you can create links between notes containing relevant research materials, sources, and your own analysis. This allows you to easily jump between different notes without losing context and facilitates a more fluid and interconnected research experience.
Quick View of how to create links:
Create or open the note from which you want to create a link.
Identify the specific text or content within the note that you want to serve as the link anchor. This could be a word, phrase, or even an entire paragraph.
Tap and hold on the anchor text until it is highlighted. A popup menu will appear.

From the popup menu, tap on the “Add Link” option.
A new window will open, displaying a list of your existing notes.
Scroll through the list or use the search bar at the top to find the note you want to link.
Once you locate the desired note, tap on it to create the link.

The anchor text in your original note will now be underlined and appear in blue, indicating that it is a link.

To navigate to the linked note, simply tap on the anchor text within your original note.If you want to edit or remove the link, tap on the linked text, and select the “Edit” option from the popup menu. You can then modify or delete the link as needed.

By following these steps, you can easily create links between notes in Apple Notes, establishing connections and improving the organization and accessibility of your notes. This feature enables seamless navigation between related information, helping you to stay organized and efficiently manage your notes.

