Close Menu

    Subscribe to Updates

    Get the latest creative news from FooBar about art, design and business.

    What's Hot

    Windows 10 End of Service: What Must Be Done

    19 March 2025

    Elementor #7217

    5 March 2025

    Why Windows is Still the Best for Gamers: A Deep Dive

    27 February 2025
    Facebook X (Twitter) Instagram
    Facebook X (Twitter) Instagram Vimeo
    Let's Tech It Easy
    Subscribe Login
    • Homepage
    • About
    • Blog
      • Computers
      • Cloud
      • Gaming
      • Cyber Security
      • iPhone
      • Mac
      • Windows
      • Android
    • Contact
    • My Tickets
    • Submit Ticket
    Let's Tech It Easy
    Home»Computers»MacOS on Windows Virtual Box
    Computers

    MacOS on Windows Virtual Box

    Ishab TimalsinaBy Ishab Timalsina10 February 2023Updated:16 June 2023No Comments4 Mins Read
    Facebook Twitter Pinterest LinkedIn Tumblr WhatsApp VKontakte Email
    https://www.ipodhacks142.com/how-to-install-macos-10-12-sierra-on-windows-using-a-virtual-machine-virtualbox/
    Share
    Facebook Twitter LinkedIn Pinterest Email

    How to run Mac OS on a Windows Laptop using VirtualBox

    Installing Mac OS on a Windows laptop can be a bit of a challenge, but with the right tools and some patience, you can have both operating systems running on the same machine. This will allow you to enjoy the best of both worlds and switch between them as needed. Here is a step-by-step guide to help you install Mac OS on your Windows laptop.

    Step 1: Check the System Requirements Before you start the installation process, you need to make sure your Windows laptop meets the system requirements for running Mac OS. To do this, you will need to check the following:

    • Processor: Your laptop must have an Intel processor.
    • RAM: Your laptop must have at least 4GB of RAM.
    • Storage: Your laptop must have at least 128GB of free storage space.
    • Graphic Card: Your laptop must have a graphics card that is compatible with Mac OS.

    Step 2: Create a Backup of Your Data It’s important to make a backup of all your important data before you start the installation process. This will ensure that your data is safe in case anything goes wrong during the installation process. You can use an external hard drive or a cloud storage service like Google Drive or Dropbox to store your backup.

    Step 3: Download Mac OS. The next step is to download Mac OS. You can do this by visiting the Apple website and downloading the latest version of Mac OS. Once you have purchased the software, you will receive a download link.

    Step 4: Download a Virtual Machine Software A virtual machine software will allow you to run Mac OS on your Windows laptop. There are several options available, including VirtualBox, VMware Workstation Player, and Parallels Desktop. For this guide, we will use VirtualBox. VirtualBox is a powerful virtualization software that allows users to run multiple operating systems on a single machine. This can come in handy for Windows users who want to try out Mac OS without having to buy a separate Apple device. You can download VirtualBox from official website here.

    https://hardwaresfera.com/en/articulos/que-es-virtualbox/

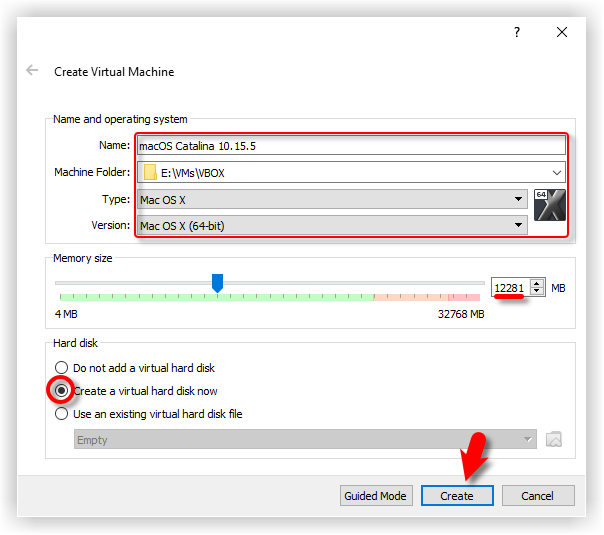
    Step 5: Create a New Virtual Machine Once you have installed VirtualBox, you need to create a new virtual machine. To do this, follow these steps:

    • Open VirtualBox and click on the “New” button.
    • Give your virtual machine a name, select “Mac OS” as the type, and select “Mac OS X” as the version.
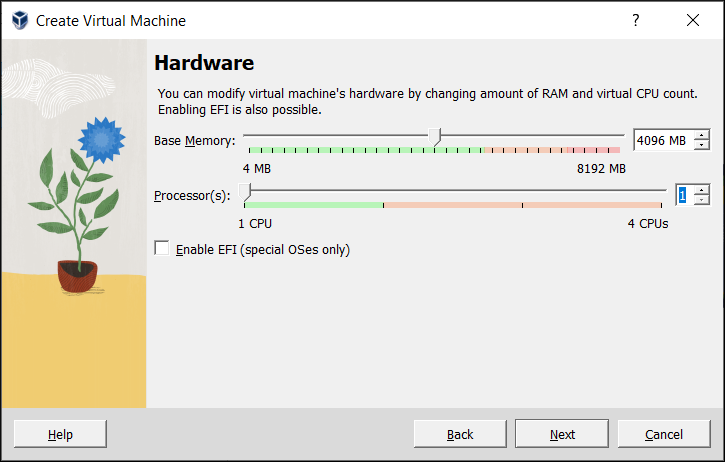
    • Allocate at least 4GB of RAM and 128GB of storage space to your virtual machine.
    • Attach the Mac OS ISO file that you downloaded earlier to the virtual machine.

    https://www.wikigain.com/install-macos-catalina-on-virtualbox-on-windows/

    Step 6: Install Mac OS With the virtual machine set up, you can now install Mac OS on your Windows laptop. To do this, follow these steps:

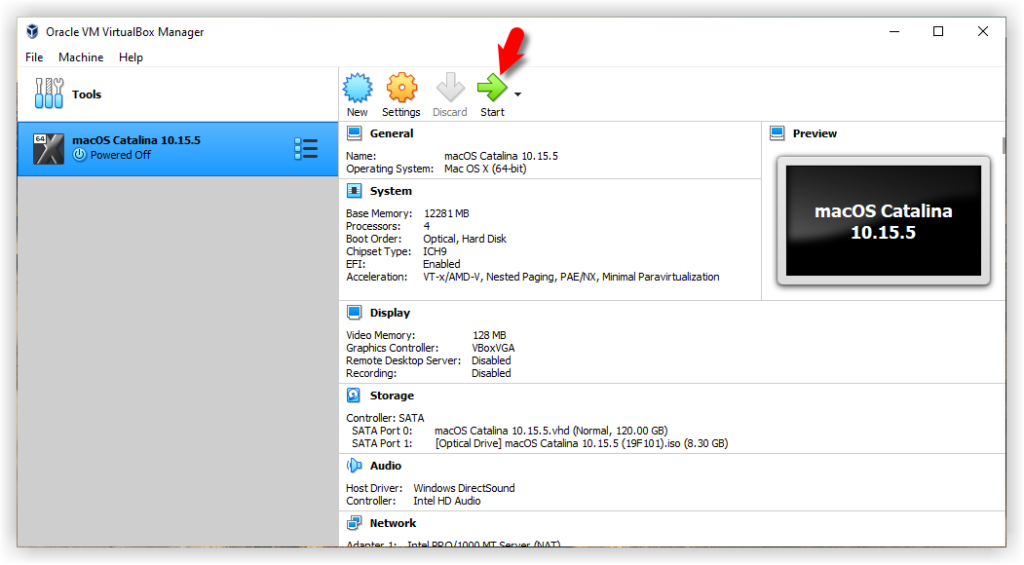
    • Start the virtual machine and select the Mac OS ISO file that you attached earlier.
    • Follow the on-screen instructions to install Mac OS. You will be asked to select your language, region, and keyboard layout.
    • Create a new account and follow the rest of the installation process.

    Step 7: Configure Your Virtual Machine Once Mac OS is installed, you need to configure your virtual machine so that it runs optimally. To do this, follow these steps:

    • Go to the settings of your virtual machine and select “Storage.”
    • Add a new storage controller and select “Add SATA Controller.”
    • Attach a new virtual hard disk to your SATA controller.
    • Go to the settings of your virtual machine and select “Display.”
    • Increase the video memory to 128MB.

    https://www.wikigain.com/install-macos-catalina-on-virtualbox-on-windows/

    Step 8: Start Using Mac OS with Mac OS installed and configured on your Windows laptop, you can now start using it. You can switch between Windows and Mac OS as needed by simply starting the appropriate virtual machine.

    https://www.wikigain.com/install-macos-catalina-on-virtualbox-on-windows/

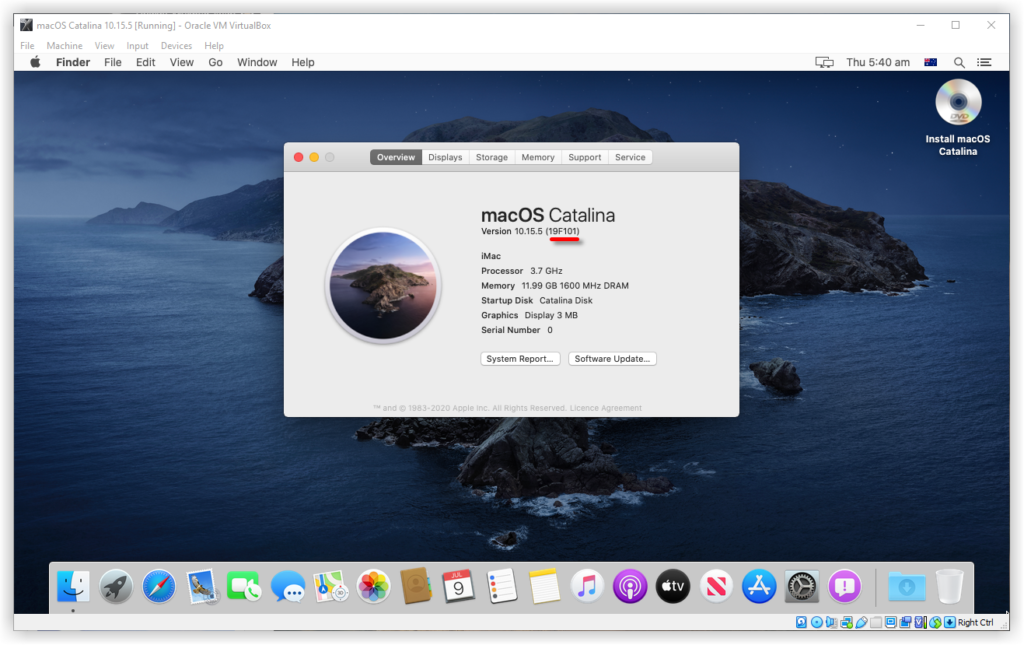
    Running Mac OS on a Windows laptop using VirtualBox is a simple process that allows you to experience the best of both worlds. Follow these steps and you’ll be up and running in no time!

    computer Mac macos Virtual VirtualBox Windows
    Share. Facebook Twitter Pinterest LinkedIn Tumblr WhatsApp Email
    Previous ArticleServerless Architecture
    Next Article Windows Server 2022
    Ishab Timalsina

    Related Posts

    Windows 10 End of Service: What Must Be Done

    19 March 2025

    Elementor #7217

    5 March 2025

    Why Windows is Still the Best for Gamers: A Deep Dive

    27 February 2025

    Accessing a Windows External Hard Drive on Mac

    26 February 2025
    Leave A Reply Cancel Reply

    This site uses Akismet to reduce spam. Learn how your comment data is processed.

    Demo
    Our Picks
    • Facebook
    • Twitter
    • Pinterest
    • Instagram
    • YouTube
    • Vimeo
    Don't Miss
    Business

    Windows 10 End of Service: What Must Be Done

    By Uneeb19 March 20250

    On October 14, 2025, Microsoft will officially end support for Windows 10, signalling a major shift…

    Elementor #7217

    5 March 2025

    Why Windows is Still the Best for Gamers: A Deep Dive

    27 February 2025

    Accessing a Windows External Hard Drive on Mac

    26 February 2025

    Subscribe to Updates

    Get the latest creative news from SmartMag about art & design.

    You too can join us

    If you also think about technology and want to contribute either as a mentor or even from a learner’s perspective, look no further and join us. Write us at [email protected] and share your opinion. Our team will get back by sending you an invite to join the platform as a contributor. Empower others, empower yourself so each one of us can play with the technology safely one day without being scared.

    Subscribe Here
    Loading
    For Partnership Worldwide

    Contact:

    [email protected]


    About Us
    About Us

    “Let’s Tech It Easy” or popularly known as “LTIE” is the blogging platform for everyone who wants to share and learn about technology. It is an initiative by the serial techpreneur Vish when he realized the wide gap between the pace at which the technology is evolving and at which it is getting adopted by a wider audience.

    Email Us: [email protected]

    Latest Posts

    Upgrading RAM

    10 March 2023

    Desktop Vs Laptop

    10 March 2023

    Data Recovery

    3 March 2023

    MacOS on Windows Virtual Box

    10 February 2023

    macOS Monterey and what’s new in it?

    12 April 2022
    New Comments
    • How to Troubleshoot Sound and Mic on Windows 10 - Let's Tech It Easy on How to Access Troubleshooters on Windows 10
    • How to Stay Safe While Using Public Wi-Fi Networks - Let's Tech It Easy on Internet Security for Home Users – VPN 101
    • How to Set up Oracle VirtualBox on a Mac - Let's Tech It Easy on How to Install Windows 10 on a Mac Using Boot Camp Assistant
    • DoS Attack Implementation and Prevention in Ubuntu – Let's Tech It Easy on Top Kali Linux Commands
    Facebook X (Twitter) Instagram Pinterest
    • Homepage
    • About
    • Blog
    • Contact
    • Computers
    • Cloud
    • Gaming
    • Cyber Security
    • iPhone
    • Mac
    • Windows
    • My Tickets
    • Submit Ticket
    © 2025 LetsTechitEasy. Designed by Sukrit Infotech.

    Type above and press Enter to search. Press Esc to cancel.

    Sign In or Register

    Welcome Back!

    Login below or Register Now.

    Lost password?

    Register Now!

    Already registered? Login.

    A password will be e-mailed to you.