
Installing macOS from a bootable installer can be helpful if you want to install macOS on several computers without downloading the installer each time or if a compatible macOS cannot be installed through the Finder or macOS Recovery. You don’t require a bootable installer to update or completely reinstall macOS.
Things you need to create a bootable drive
USB flash drive or another secondary media formatted in Mac OS Extended with at least 14GB of available capacity.
OS X El Capitan or later installer. Your Mac must be running the most recent version of OS X El Capitan, macOS Sierra, or any other later version of macOS to download the entire installation. Download the macOS you’re downloading from a Mac that is compatible with it. Enterprise admins should get updates from Apple instead of a service hosted locally.
Your Mac could require additional storage space if you utilise these techniques in place of Software Update so that macOS can be downloaded and installed.
You can use the app store or browser to search the macOS.
Click the Get button in the App Store to start downloading the macOS software.
The installer launches instantly after downloading to your Applications folder. To install macOS, adhere to the onscreen directions.
Click the link to get that macOS version’s disc image (.dmg) file.
To view the. Pkg file inside the .dmg file, double click.
Double-click the. Pkg file, then adhere to the prompts on the screen. This sets up your Applications folder with the macOS installation.
Double-click the Install [Version Name] macOS installer after opening the Applications folder. To install macOS, adhere to the onscreen directions.
Steps to follow to create a bootable drive
To use as the bootable installer’s volume, insert a USB flash drive or another suitable book.
For this procedure, you should utilise the Disk Utility software. In Disk Utility, click “Erase” from the context menu of the right-clicked USB disc.
Select the GUID Partition Map partitioning method and “Mac OS Extended (Journaled)” as your USB drive’s format.
If you can’t find them, click “view” and “Show all devices.”
Erase the USB drive by selecting it from the context menu, then choose the partition table.
After it is finished, download macOS, as mentioned above. Download the most recent installer for macOS from the App Store unless you have a reason to install an older version.
It may take a while with the macOS size to download. After that, you complete the installation steps. Follow the below-mentioned steps to create a bootable installer.
Launch Terminal from your Applications folder’s utility folder.
You can type one of the following instructions into Terminal, paste it there, and then hit Enter. Each command assumes that the installer is located in the Applications folder and that the volume being used, MyVolume, is a USB flash drive. Replace the volume in the command with the name of your book if it has a different name.
Then the installation process will start.
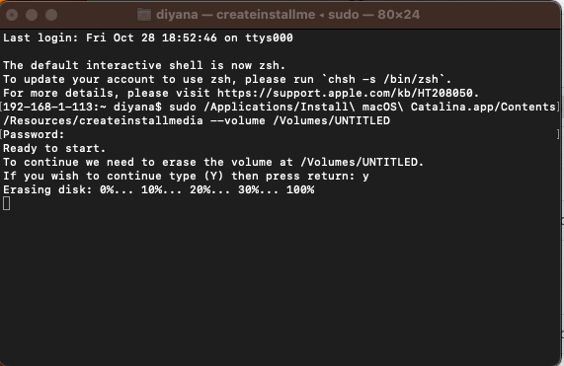
When prompted, enter your administrator password, which means you agree to erase the current drive. Characters are not seen in the Terminal as you type. Next, hit ENTER.
When prompted, enter after typing “Y” to indicate your desire to erase the volume. As the volume is erased, progress is displayed in the Terminal.
A warning that the Terminal attempts to access files on portable drives may appear after the volume has been deleted. Click OK to continue copying.

The volume will have the same name as the downloaded installer once the Terminal notifies you that it is finished. B. Install macOS Monterey.
Now you can exit the Terminal and eject the volume.
Enter one of the following instructions in Terminal as directed above, depending on the version of macOS you downloaded.
As seen in the line below for El Capitan, the command should end with —the application path followed by the appropriate installer path if your Mac is running macOS Sierra or older.
Ventura
sudo /Applications/Install\ macOS \Ventura.app/Contents/ Resources/createinstallmedia – -volume/Volumes/MyVolume
Monterey
sudo /Applications/Install\ macOS \Monterey.app/Contents/ Resources/createinstallmedia – -volume/Volumes/MyVolume
Big Sur
sudo /Applications/Install\ macOS \Big\ Sur.app/Contents/ Resources/createinstallmedia – -volume/Volumes/MyVolume
Catalina
sudo /Applications/Install\ macOS \Catelina.app/Contents/ Resources/createinstallmedia – -volume/Volumes/MyVolume
Mojave
sudo /Applications/Install\ macOS \Mojave.app/Contents/ Resources/createinstallmedia – -volume/Volumes/MyVolume
High Sierra
sudo /Applications/Install\ macOS\ High\ Sierra.app/Contents/Resources/createinstallmedia –volume /Volumes/MyVolume
EI Capitan
sudo /Applications/Install\ OS\ X\ El\ Capitan.app/Contents/Resources/createinstallmedia –volume /Volumes/MyVolume –application path /Applications/Install\ OS\ X\ El\ Capitan.app
There are two potential methods to use a bootable installation on a MacMac with Apple silicon or a MacMac with an Intel CPU.
Please follow these instructions if you have a Mac built using Apple silicon.
Connect the bootable installer to a Mac that can run the version of macOS you’re installing and is online. (A bootable installation needs an internet connection to download firmware and other information relevant to the Mac model; it does not download macOS from the internet.)
Hold the power button while turning on the MacMac until the startup choices box, which shows your bootable volumes, appears.
Click Continue after selecting the drive that contains the bootable installer.
Follow the onscreen installation instructions when the macOS installer opens.
If an Intel processor powers your Mac,
Connect the bootable installer to a Mac that can run the version of macOS you’re installing and is online. (A bootable installation needs an internet connection to download firmware and other information relevant to the Mac model; it does not download macOS from the internet.)
Press the Option (Alt) key after turning on your MacMac.
When you see your bootable volumes shown on a dark screen, let go of the Option key.
Choose the drive that has the installer on it. Then either tap Return or the onscreen arrow.
Check that Startup Security Utility is configured to allow booting from external or removable media if you cannot start your computer from the bootable installer.
If prompted, select your preferred language.
From the utility window, choose Install macOS (or Install OS X), then click Continue and adhere to the prompts on the screen.
Mac computers with apple silicon came in late 2020. You can check whether your laptop has apple silicon by clicking on this Mac. If it displays “chip,” it is a mac with apple silicon. Otherwise, it will show “processor.”