Creating a multiple users account on mac is easy task which will ensure that everyone who uses it can personalize their setting and keep their files separate. Having additional accounts in mac is helpful in several ways such as you may want to set up parental restrictions for your children or protect the primary account’s sensitive information. Also, separate accounts allow different users to customize features such as selecting a specific background, screensaver, or theme.
Types of account you can create in mac are:
- Standard account
It is suitable for families who want their children or significant other to have a separate user account from their own, all while sharing the same Mac. Other Mac users can’t access files of other accounts. Standard users can install apps and change their own settings but can’t add other users or change other users’ settings.
- Guest account
This account is designed to let your friends and family use your computer temporarily, and as a result, information and settings that are created or accessed by the guest account are deleted and/or reset every time the user logs out. This makes it feel like you’re logging into a factory-restored Mac each time you use it. This means that’s if guest account users created any files, it must be save to USB, Dropbox or other storage medium before logging out.
- Admin account
Creating a multiple admin account is a tough decision as it is related with the security of MacOS. But there are certainly some situations where having multiple administrator accounts would come in handy. Just to list a few:
- When two parents need their own accounts to better manage their kids’ accounts
- When there is more than one administrator at a facility or institution, such as a school
- When some people need higher privileges than other users on your computer
- Sharing only
With the sharing account, it is easier to access the files and folders remotely as it is designed to share files. But the sharing users cannot log in to your mac or change the system.
- Group account
Group account bundles all mac users account and provide the same privileges. For example, you can grant a group specific access privileges for a folder or a file, and all members of the group have access. You can also assign a group specific access privileges for each of your shared folders.
Here are the steps to create group accounts:
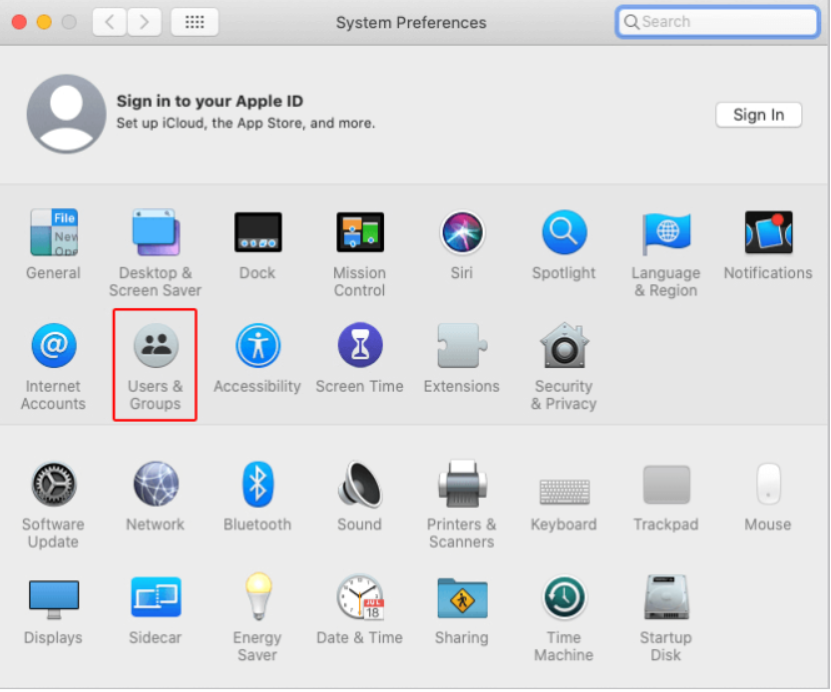
- On your Mac, choose Apple menu > System Settings, then click Users & Groups in the sidebar. (You may need to scroll down.)
- Click the Add Group button. (You may need to scroll down.)
- Click the New Group pop-up menu, give the group a name, then click Create Group.
- Click the Info button next to a group, then enable users in the list that appears.
To permit new users to share your files and share your screen, you may need to change options in File Sharing, Screen Sharing or Remote Management settings.
Create a user’s account on MacOS
Here are the steps to create a account:
- Open System Settings on Mac running macOS Ventura or later.
- Select Users & Groups.

- To enable a guest account, hit the info button ⓘ next to Guest User and enable the switch for ‘Allow guests to log in to this computer.’ Optionally, you can also block adult websites for guests and allow them to connect to shared folders.
- To create a new account, click Add Account and enter your Mac’s admin password.
- Select the type of account from the drop-down menu next to New Account.
- Fill out the form with the full name, account name (keep it short with no spaces), and password. With all done, hit Create User.
How to change account into administration account ?
- At the top-left corner of the desktop screen, click the Apple icon.
- Select System Settings from the apple menu.
- In the left section, scroll down and click the Users & Groups selector.

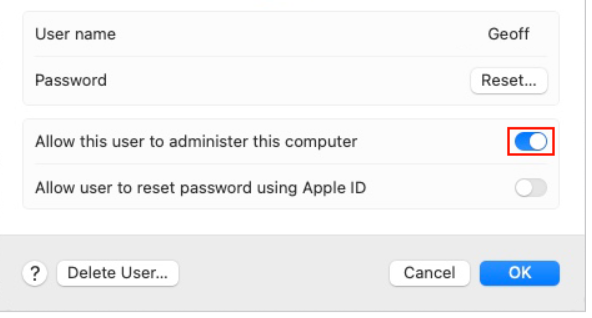
- In the right section, click the information icon next to the account you want to grant administrative privileges.
- In the account’s window, click the toggle switch next to Allow this user to administer this computer so that it’s in the on position.

Change Password on you Mac

Here are the steps to change user’s password in your macOS:
- On your Mac, choose Apple menu > System Settings, then click Users & Groups in the sidebar. (You may need to scroll down.)
If you’ve forgotten your login password and can’t log in to your Mac, see the Apple Support article If you forgot your Mac login password.
- Click the Info button next to your username on the right.
- Click Change.
- Enter your current password in the Old Password field.
- Enter your new password in the New Password field, then enter it again in the Verify field.
For help choosing a secure password, click the Key button next to the New Password field.
- Enter a hint to help you remember the password.
The hint appears if you enter the wrong password three consecutive times, or if you click the question mark in the password field in the login window.
- Click Change Password.
Conclusion
Creating user accounts in macOS is a straightforward process that empowers users with personalized settings and security features. By following these steps, you can easily set up new accounts tailored to specific needs, whether for work, family, or personal use. Remember, maintaining secure passwords and periodically reviewing account permissions ensures a smooth and safe computing experience for all users. With these practices in mind, you’re ready to leverage the full potential of macOS while keeping your digital workspace organized and secure.
References
Apple Support. (n.d.). Add a user or group on Mac. [online] Available at: https://support.apple.com/en-au/guide/mac-help/mchl3e281fc9/mac [Accessed 18 Jul. 2024].
www.computerhope.com. (n.d.). How to Switch Users on a Mac. [online] Available at: https://www.computerhope.com/issues/ch002158.htm [Accessed 18 Jul. 2024].
