Close Menu

    Subscribe to Updates

    Get the latest creative news from FooBar about art, design and business.

    What's Hot

    Windows 10 End of Service: What Must Be Done

    19 March 2025

    Elementor #7217

    5 March 2025

    Why Windows is Still the Best for Gamers: A Deep Dive

    27 February 2025
    Facebook X (Twitter) Instagram
    Facebook X (Twitter) Instagram Vimeo
    Let's Tech It Easy
    Subscribe Login
    • Homepage
    • About
    • Blog
      • Computers
      • Cloud
      • Gaming
      • Cyber Security
      • iPhone
      • Mac
      • Windows
      • Android
    • Contact
    • My Tickets
    • Submit Ticket
    Let's Tech It Easy
    Home»Computers»Active directory setup
    Computers

    Active directory setup

    Mourya BatchuBy Mourya Batchu5 April 2023Updated:21 April 2023No Comments4 Mins Read
    Facebook Twitter Pinterest LinkedIn Tumblr WhatsApp VKontakte Email
    Share
    Facebook Twitter LinkedIn Pinterest Email

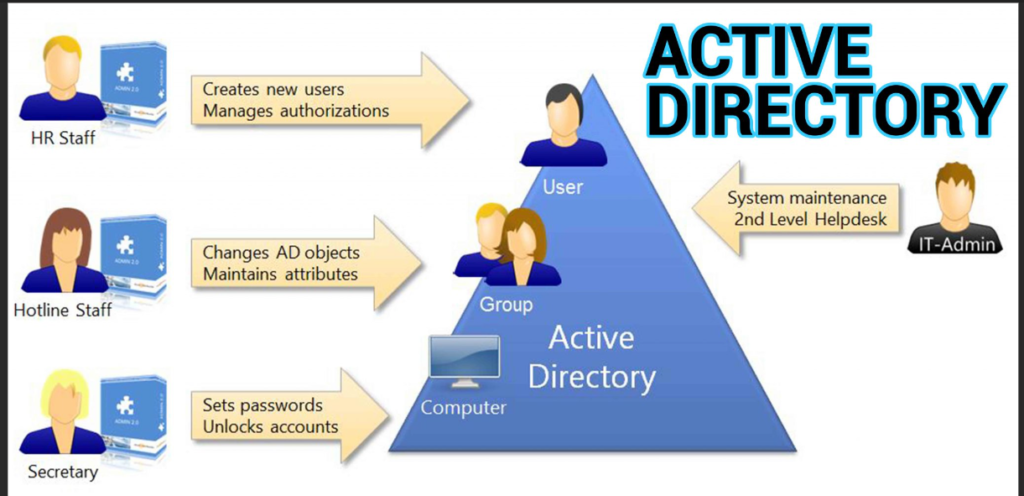
    Active Directory (AD) is a powerful tool for managing network resources in a Windows environment. It provides centralized authentication and authorization, and allows administrators to manage users, computers, and other network resources from a single location. In this blog, we will discuss how to set up Active Directory in Windows Server.

    Before we begin, it is important to note that Active Directory requires a Windows Server operating system. Therefore, you must first have a Windows Server installed and configured before proceeding with the steps outlined in this blog.

    image on configuring active directory – Bing images

    Step 1: Install Active Directory Domain Services (AD DS)

    The first step in setting up Active Directory is to install the Active Directory Domain Services (AD DS) role on your Windows Server. To do this, follow these steps:

    1. Open Server Manager by clicking on the Server Manager icon in the taskbar or by searching for it in the Start menu.
    2. Click on Manage in the top right corner of the Server Manager window and select Add Roles and Features.
    3. Click Next until you reach the Server Roles screen, and then select Active Directory Domain Services.
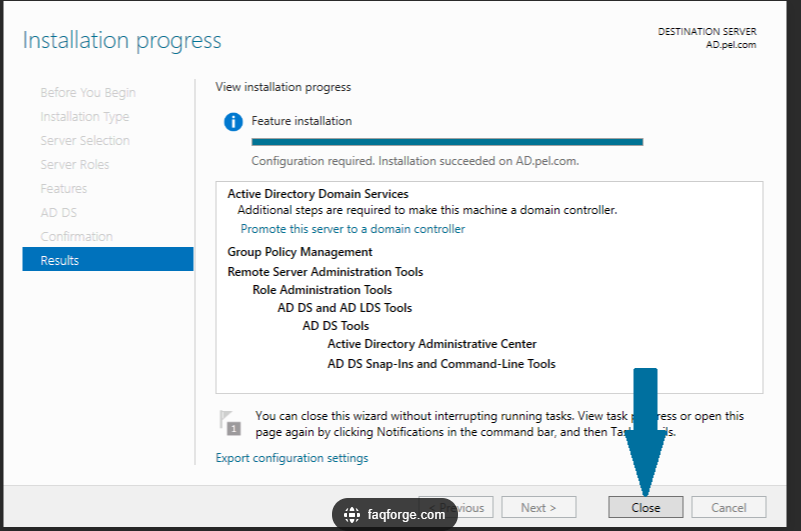
    4. Follow the on-screen instructions to complete the installation process.
    image on configuring active directory – Bing images

    Step 2: Promote the Server to a Domain Controller

    Once the AD DS role is installed, the next step is to promote the server to a domain controller. To do this, follow these steps:

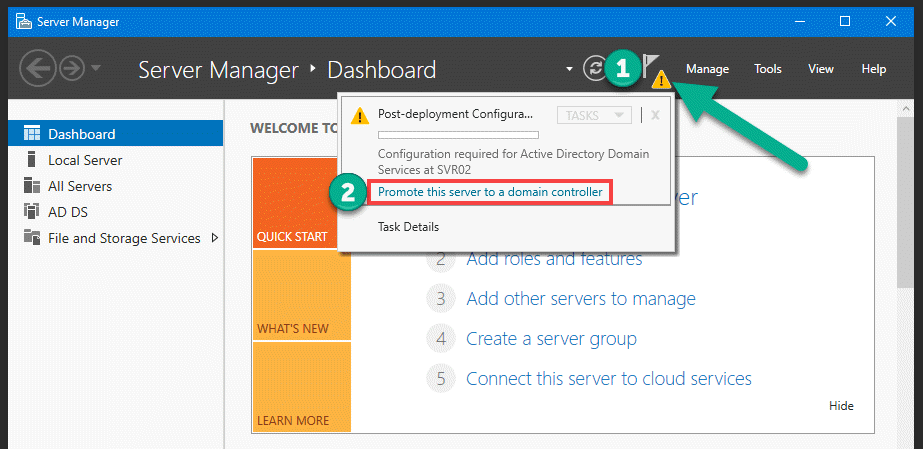
    1. Open the Server Manager and click on the notification flag in the top right corner of the window.
    2. Click on Promote this server to a domain controller.
    3. In the Deployment Configuration screen, select Add a new forest and enter the root domain name that you want to use.
    4. In the Domain Controller Options screen, select the appropriate options for your environment.
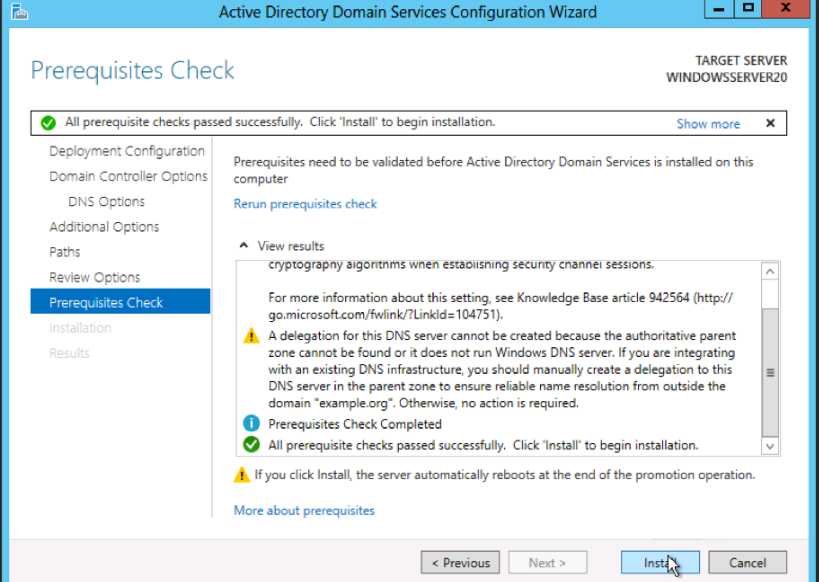
    5. In the DNS Options screen, select the appropriate options for your environment.
    6. Follow the on-screen instructions to complete the promotion process.
    image on configuring active directory – Bing images

    Step 3: Configure Active Directory

    Once the server has been promoted to a domain controller, the next step is to configure Active Directory. To do this, follow these steps:

    1. Open the Active Directory Users and Computers console by clicking on the Start menu and selecting Administrative Tools > Active Directory Users and Computers.
    2. Create the necessary organizational units (OUs) to organize your resources. For example, you might create OUs for departments, geographic locations, or job roles.
    3. Create user accounts for each user that will need to access network resources.
    4. Create computer accounts for each computer that will need to access network resources.
    5. Create groups to organize users and computers into logical groups. For example, you might create a group for each department or job role.
    6. Assign permissions to resources by using group membership.

    Step 4: Configure Group Policy

    Group Policy is a powerful tool for managing computer and user settings in an Active Directory environment. To configure Group Policy, follow these steps:

    1. Open the Group Policy Management console by clicking on the Start menu and selecting Administrative Tools > Group Policy Management.
    2. Create a new Group Policy Object (GPO) or edit an existing one.
    3. Configure the settings that you want to apply to computers and users.
    4. Link the GPO to the appropriate OU or container.
    5. Verify that the GPO is being applied by logging on to a computer as a user that is a member of the appropriate group.
    image on configuring active directory – Bing images

    Conclusion

    Setting up Active Directory is an important task for any Windows administrator. By following the steps outlined in this blog, you can easily set up Active Directory and begin managing your network resources from a central location. Remember to configure Group Policy to ensure that your network is secure and your users are productive. With Active Directory in place, you can simplify the management of your network and improve the overall efficiency of your organization.

    Steps to setup active directory.
    Share. Facebook Twitter Pinterest LinkedIn Tumblr WhatsApp Email
    Previous ArticleBootable drive
    Next Article Ticketing system
    Mourya Batchu

    Related Posts

    Windows 10 End of Service: What Must Be Done

    19 March 2025

    Elementor #7217

    5 March 2025

    Why Windows is Still the Best for Gamers: A Deep Dive

    27 February 2025

    Accessing a Windows External Hard Drive on Mac

    26 February 2025
    Leave A Reply Cancel Reply

    This site uses Akismet to reduce spam. Learn how your comment data is processed.

    Demo
    Our Picks
    • Facebook
    • Twitter
    • Pinterest
    • Instagram
    • YouTube
    • Vimeo
    Don't Miss
    Business

    Windows 10 End of Service: What Must Be Done

    By Uneeb19 March 20250

    On October 14, 2025, Microsoft will officially end support for Windows 10, signalling a major shift…

    Elementor #7217

    5 March 2025

    Why Windows is Still the Best for Gamers: A Deep Dive

    27 February 2025

    Accessing a Windows External Hard Drive on Mac

    26 February 2025

    Subscribe to Updates

    Get the latest creative news from SmartMag about art & design.

    You too can join us

    If you also think about technology and want to contribute either as a mentor or even from a learner’s perspective, look no further and join us. Write us at [email protected] and share your opinion. Our team will get back by sending you an invite to join the platform as a contributor. Empower others, empower yourself so each one of us can play with the technology safely one day without being scared.

    Subscribe Here
    Loading
    For Partnership Worldwide

    Contact:

    [email protected]


    About Us
    About Us

    “Let’s Tech It Easy” or popularly known as “LTIE” is the blogging platform for everyone who wants to share and learn about technology. It is an initiative by the serial techpreneur Vish when he realized the wide gap between the pace at which the technology is evolving and at which it is getting adopted by a wider audience.

    Email Us: [email protected]

    Latest Posts

    Upgrading RAM

    10 March 2023

    Desktop Vs Laptop

    10 March 2023

    Data Recovery

    3 March 2023

    MacOS on Windows Virtual Box

    10 February 2023

    macOS Monterey and what’s new in it?

    12 April 2022
    New Comments
    • How to Troubleshoot Sound and Mic on Windows 10 - Let's Tech It Easy on How to Access Troubleshooters on Windows 10
    • How to Stay Safe While Using Public Wi-Fi Networks - Let's Tech It Easy on Internet Security for Home Users – VPN 101
    • How to Set up Oracle VirtualBox on a Mac - Let's Tech It Easy on How to Install Windows 10 on a Mac Using Boot Camp Assistant
    • DoS Attack Implementation and Prevention in Ubuntu – Let's Tech It Easy on Top Kali Linux Commands
    Facebook X (Twitter) Instagram Pinterest
    • Homepage
    • About
    • Blog
    • Contact
    • Computers
    • Cloud
    • Gaming
    • Cyber Security
    • iPhone
    • Mac
    • Windows
    • My Tickets
    • Submit Ticket
    © 2025 LetsTechitEasy. Designed by Sukrit Infotech.

    Type above and press Enter to search. Press Esc to cancel.

    Sign In or Register

    Welcome Back!

    Login below or Register Now.

    Lost password?

    Register Now!

    Already registered? Login.

    A password will be e-mailed to you.