
Upgrading RAM on Desktops and Laptops: An Ultimate Guide
Random Access Memory, commonly known as RAM, is one of the crucial components of a computer system that determines its speed and performance. RAM allows the computer to access data quickly and efficiently, enabling programs to run smoothly. As software and applications become more demanding, upgrading RAM can be an effective way to boost the performance of your computer. In this article, we will explore the process of upgrading RAM on desktops and laptops, and how it can improve the overall performance of your system.
Why Upgrade RAM?
As mentioned, upgrading RAM can help to improve the performance of your computer. This is because RAM acts as a temporary storage space for data that is currently in use by the computer. When the computer runs out of RAM, it starts to use the hard drive as a substitute, which is much slower and can cause performance issues. Upgrading RAM can prevent this from happening and allows the computer to access data faster, leading to faster load times and improved multitasking capabilities.
Another reason to upgrade RAM is to support new software and applications. As new software becomes more demanding, the amount of RAM required to run it effectively also increases. If your computer does not have enough RAM, it may struggle to run these new applications and could even crash. Upgrading RAM ensures that your computer can handle these new applications without any issues.
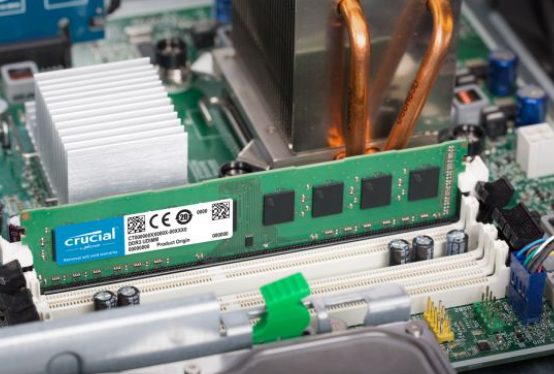
Desktop RAM Upgrades
Upgrading RAM on a desktop computer is relatively straightforward and can be done in a few simple steps.
Step 1: Check Compatibility
Before purchasing new RAM, it is essential to check the compatibility of the new RAM with your computer. You can do this by checking your computer’s documentation or by using an online tool such as Crucial’s System Scanner, which scans your computer and provides a list of compatible RAM upgrades.
Step 2: Locate RAM Slots
Desktop computers have dedicated slots for RAM on the motherboard. These slots are typically located near the CPU and are easily accessible by removing the computer case. Refer to your computer’s documentation to locate the RAM slots.
Step 3: Remove Old RAM
To remove the old RAM, gently push down on the retention clips on either side of the RAM module. The module should then lift out of the slot. If you are replacing all of the RAM, remove all the modules. If you are adding new RAM, leave the existing modules in place.
Step 4: Insert New RAM
Insert the new RAM modules into the empty slots or alongside the existing modules, making sure that the notches on the module line up with the notches in the slot. Press down firmly until the retention clips click into place. Ensure that the modules are securely seated in the slots.
Step 5: Power On
Once the new RAM is installed, replace the computer case and power on the computer. The computer should automatically recognize the new RAM and adjust its settings accordingly.
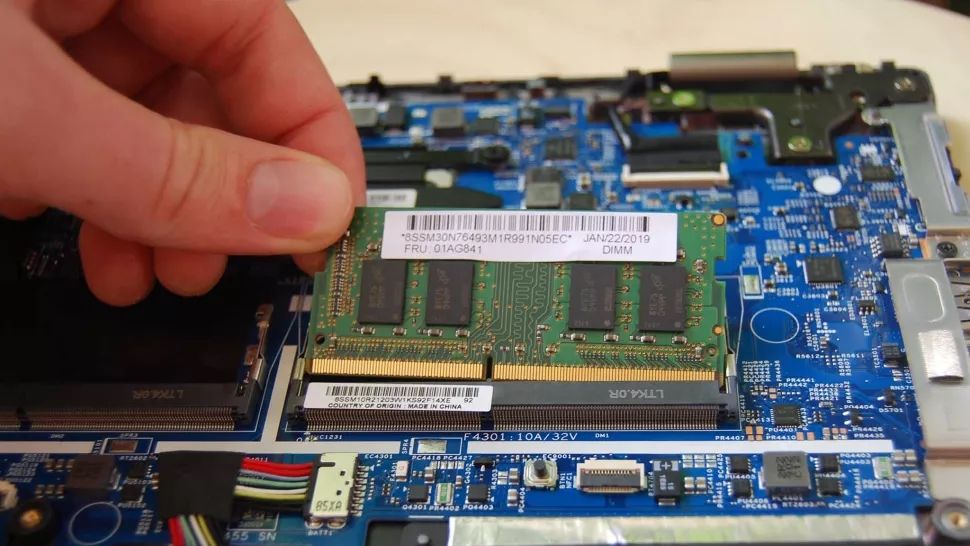
Laptop RAM Upgrades
pgrading the RAM on a laptop is a cost-effective and straightforward way to improve the overall performance of your device. RAM stands for Random Access Memory, which is responsible for temporarily storing and accessing data that your laptop is currently using. If your laptop is running slow or struggling to handle multiple tasks, upgrading the RAM can make a significant difference. In this guide, we will take you through the process of upgrading the RAM on your laptop step by step.
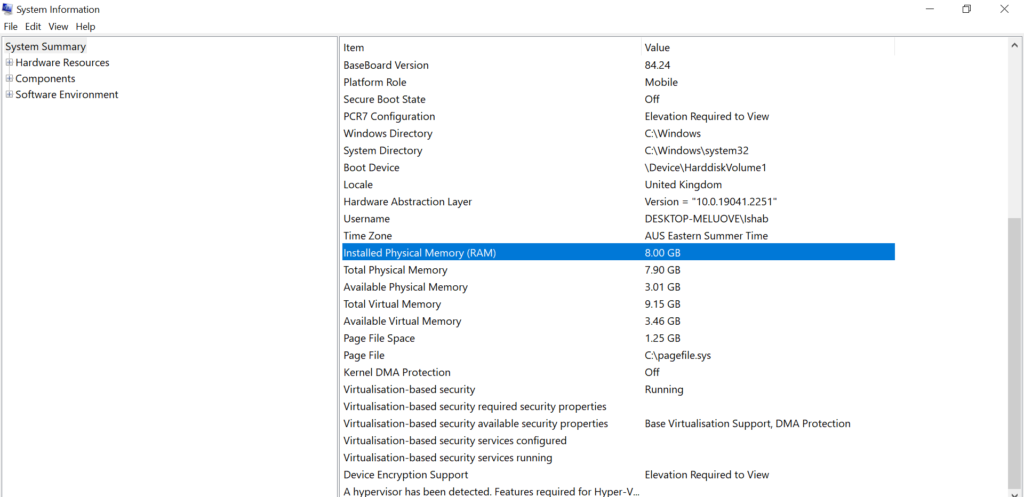
Determine your laptop’s RAM capacity
Determine your laptop’s RAM capacity Before upgrading your laptop’s RAM, you need to find out the maximum amount of RAM it can support. You can do this by checking the user manual or searching online using the laptop’s model number. The RAM capacity can also be found in the laptop’s system properties. Once you know the maximum RAM capacity, you can decide how much RAM you want to add.
Buy the right type of RAM
There are many different types of RAM available, so it’s essential to buy the correct type for your laptop. The most common types of RAM are DDR3 and DDR4, but you should check your laptop’s specifications to confirm which type is compatible. You also need to ensure that the RAM speed matches the laptop’s requirements.
Prepare your laptop for RAM upgrade
Before you start upgrading the RAM on your laptop, you need to turn it off, unplug it from the power source, and remove the battery. It’s also important to ground yourself by touching a metal object to discharge any static electricity.
Locate and remove the RAM compartment cover
Most laptops have a RAM compartment cover on the bottom, which is easy to remove. You need to remove the screws that secure the cover and gently lift it off to access the RAM modules.
Remove the existing RAM modules
The RAM modules are held in place by clips on either side. You need to gently push the clips away from the RAM module, and it should pop up at a 45-degree angle. You can then remove the module by carefully pulling it out.
Install the new RAM modules
Take the new RAM module and insert it into the slot at a 45-degree angle. Then, press it down until the clips on either side click into place. Repeat the process for the other RAM module if you are upgrading both.
Replace the RAM compartment cover
Once you have installed the new RAM, you need to replace the RAM compartment cover by aligning it with the screw holes and tightening the screws.
Turn on the laptop and check the RAM
After you have replaced the RAM compartment cover, you can turn on the laptop and check if the new RAM has been detected. You can do this by going into the laptop’s system properties and checking the RAM capacity.
In conclusion, upgrading the RAM on your laptop is a simple process that can significantly improve your laptop’s performance. By following these eight steps, you can easily upgrade your laptop’s RAM and enjoy a faster and more responsive device.