Close Menu

    Subscribe to Updates

    Get the latest creative news from FooBar about art, design and business.

    What's Hot

    Windows 10 End of Service: What Must Be Done

    19 March 2025

    Elementor #7217

    5 March 2025

    Why Windows is Still the Best for Gamers: A Deep Dive

    27 February 2025
    Facebook X (Twitter) Instagram
    Facebook X (Twitter) Instagram Vimeo
    Let's Tech It Easy
    Subscribe Login
    • Homepage
    • About
    • Blog
      • Computers
      • Cloud
      • Gaming
      • Cyber Security
      • iPhone
      • Mac
      • Windows
      • Android
    • Contact
    • My Tickets
    • Submit Ticket
    Let's Tech It Easy
    Home»Computers»How to setup remote viewing of Dahua system cameras
    Computers

    How to setup remote viewing of Dahua system cameras

    SamikshyaBy Samikshya6 April 2021No Comments2 Mins Read
    Facebook Twitter Pinterest LinkedIn Tumblr WhatsApp VKontakte Email
    Share
    Facebook Twitter LinkedIn Pinterest Email

    We all want security and want to feel secure in our properties. Surveillance cameras can be seen in almost every places. We were able to check our playback stored in Hard drive but now a days we are able to see them remotely through apps.

    Today I will be discussing how we setup remote viewing app (DMSS) for remote viewing of Dahua technology cameras and other products.

    DMSS is a mobile surveillance app with functions such as remote monitoring, video playback, push notifications, device initialization, and remote configuration. Devices such as IPC, NVR, XVR, VTO, doorbells, alarm hubs, and access controllers can be added. After logging to the account, you can use cloud services like cloud upgrade and so on. The app supports iOS 9.0 and Android 5.0 or later systems and can be used with 3G/4G/Wi-Fi.

    Prerequisites

    Devices already initialized

    Bring up the QR code via local monitor or web interface

    Download DMSS app through app downloading platform.

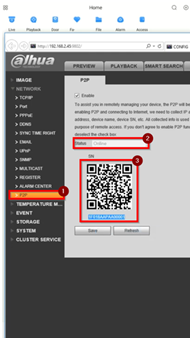
    • P2P must be turned on from the recorder and connected to a network with internet access.

    Step by Step Instructions

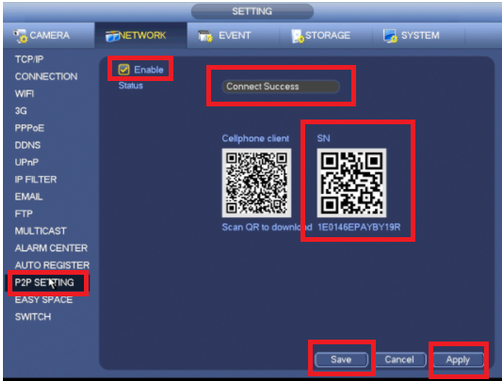
    1. Get the serial number of the recorder by accessing Settings > Network > P2P > Ensure P2P is enable and take note of the serial number shown.\

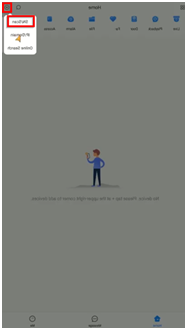
    2. Tap the + sign on the app and select SN/Scan.

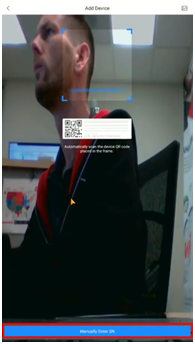
    3. The app may prompt a message for granting access to the camera scan the QR.

    4. QR scanning is an option or the serial number can be done manually.

    5. Input the serial number and tap Next.
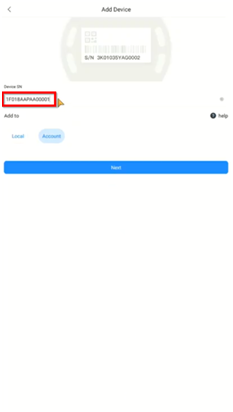
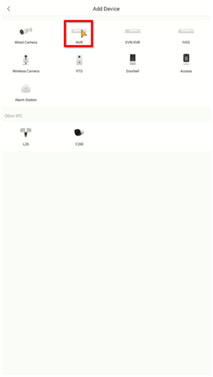
    6. Choose NVR

    7. Input the information and tap Save.

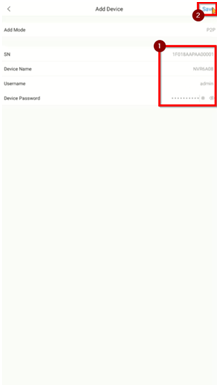
    8. Confirm the time zone and DST if necessary.

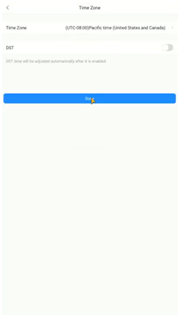
    9. After the device is added successfully, the live view will be displayed.

    cctv dahua security_system
    Share. Facebook Twitter Pinterest LinkedIn Tumblr WhatsApp Email
    Previous ArticleSet up Dahua NVR/DVR setup
    Next Article What are AI-Enhanced Cyber Threats?
    Samikshya

    Related Posts

    Windows 10 End of Service: What Must Be Done

    19 March 2025

    Elementor #7217

    5 March 2025

    Why Windows is Still the Best for Gamers: A Deep Dive

    27 February 2025

    Accessing a Windows External Hard Drive on Mac

    26 February 2025
    Leave A Reply Cancel Reply

    This site uses Akismet to reduce spam. Learn how your comment data is processed.

    Demo
    Our Picks
    • Facebook
    • Twitter
    • Pinterest
    • Instagram
    • YouTube
    • Vimeo
    Don't Miss
    Business

    Windows 10 End of Service: What Must Be Done

    By Uneeb19 March 20250

    On October 14, 2025, Microsoft will officially end support for Windows 10, signalling a major shift…

    Elementor #7217

    5 March 2025

    Why Windows is Still the Best for Gamers: A Deep Dive

    27 February 2025

    Accessing a Windows External Hard Drive on Mac

    26 February 2025

    Subscribe to Updates

    Get the latest creative news from SmartMag about art & design.

    You too can join us

    If you also think about technology and want to contribute either as a mentor or even from a learner’s perspective, look no further and join us. Write us at [email protected] and share your opinion. Our team will get back by sending you an invite to join the platform as a contributor. Empower others, empower yourself so each one of us can play with the technology safely one day without being scared.

    Subscribe Here
    Loading
    For Partnership Worldwide

    Contact:

    [email protected]


    About Us
    About Us

    “Let’s Tech It Easy” or popularly known as “LTIE” is the blogging platform for everyone who wants to share and learn about technology. It is an initiative by the serial techpreneur Vish when he realized the wide gap between the pace at which the technology is evolving and at which it is getting adopted by a wider audience.

    Email Us: [email protected]

    Latest Posts

    Upgrading RAM

    10 March 2023

    Desktop Vs Laptop

    10 March 2023

    Data Recovery

    3 March 2023

    MacOS on Windows Virtual Box

    10 February 2023

    macOS Monterey and what’s new in it?

    12 April 2022
    New Comments
    • How to Troubleshoot Sound and Mic on Windows 10 - Let's Tech It Easy on How to Access Troubleshooters on Windows 10
    • How to Stay Safe While Using Public Wi-Fi Networks - Let's Tech It Easy on Internet Security for Home Users – VPN 101
    • How to Set up Oracle VirtualBox on a Mac - Let's Tech It Easy on How to Install Windows 10 on a Mac Using Boot Camp Assistant
    • DoS Attack Implementation and Prevention in Ubuntu – Let's Tech It Easy on Top Kali Linux Commands
    Facebook X (Twitter) Instagram Pinterest
    • Homepage
    • About
    • Blog
    • Contact
    • Computers
    • Cloud
    • Gaming
    • Cyber Security
    • iPhone
    • Mac
    • Windows
    • My Tickets
    • Submit Ticket
    © 2025 LetsTechitEasy. Designed by Sukrit Infotech.

    Type above and press Enter to search. Press Esc to cancel.

    Sign In or Register

    Welcome Back!

    Login below or Register Now.

    Lost password?

    Register Now!

    Already registered? Login.

    A password will be e-mailed to you.