
Abstract
Arduino is an open source platform which has both hardware and software available. The Arduino software or IDE is available free and the hardware can be purchased from Arduino website or websites like E-bay. The purpose of using an Arduino is to program the hardware for different purposes. Arduino can be used to build a railway prototype model, prototypes for electronic projects, automatic door model etc. Arduino comes in different models like Arduino Mega, Arduino Nano, Arduino Uno etc. and all models have different number of pins, thus suiting size of the project.
Introduction
Arduino has both hardware and software available and the hardware is available for different prices. The Arduino software is free of price and can be downloaded from Arduino’s official site. The Arduino alone cannot do anything, so a full Arduino-kit should be bought which contains of multiple things. For a simplest of program like lighting a LED when a sensor detects an object, hardware required is Arduino Uno (or any Arduino), LED, jumper cables, USB, a computer, Arduino IDE software. For bigger projects like Railway project prototype, hardware would expand from to numerous Arduino, sensors, GPS module, Wi-Fi module etc. Thus, depending on the project and size of the project, size of hardware would change.
Common Arduino Hardware
For beginners, using Arduino hardware can be very tricky. Below image shows what Arduino Uno looks like and what are the pins available in it.
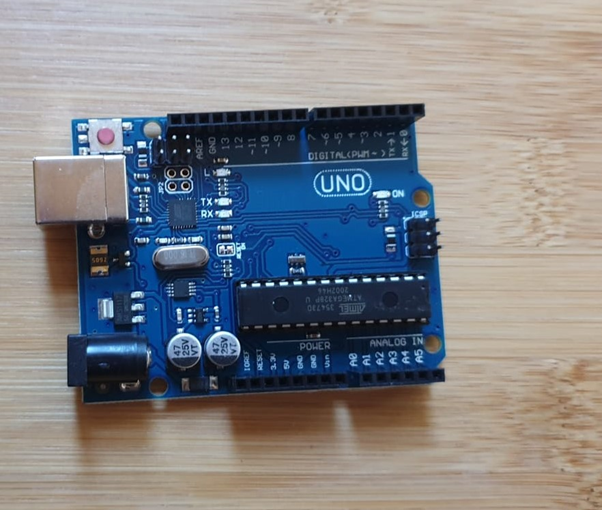
In an Arduino Uno, there are 14 digital pins, 6 analog pins, 3.3 V supply, 5.5 V supply, Ground pins, USB input. If a user does not want to buy extra power supply, simply inputting to a computer would provide supply to Arduino and can further power up different modules like GPS module, LEDs etc. It is advisable to use a breadboard since it makes easier to connect devices.
Arduino Software
Arduino software can be installed from Arduino’s website. The program is called Arduino IDE and is very simple to install on any operating system. The following windows open when Arduino IDE opens.
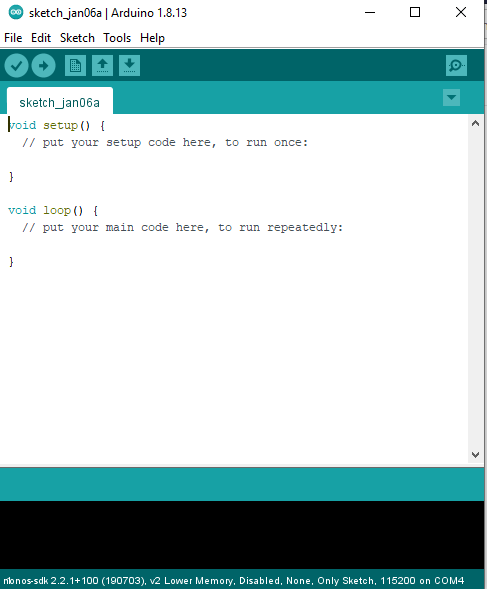
Any program can be written on Arduino IDE and in order to transfer the program it must be complied first. The compilation can be done by clicking on ‘Sketch’ and then choosing compile. The program can be transferred by clicking on ‘Sketch’ and then clicking on ‘Upload’. The program of an Arduino is called a Sketch. To create a sketch, certain setups need to be defined in the ‘void setup()’ and then all the code is to be put in ‘void loop()’. Then after the sketch has been written, it should be transferred to Arduino and it will run the sketch on Arduino hardware.
Setting up Arduino
In order to set up Arduino’s Hardware, there is a need to understand what pins are required for any device. Usually any device would have a ground pin, a VCC pin. The VCC pin is the supply needed for the device, so depending on the voltage of device it can be inputted in 5 volts and 3.3 volts. An Arduino supplied power from a computer might not be able to power up all the devices. So, an external power can power up all the devices. Thus, depending upon on how many devices are connected to the Arduino, an external power supply should be connected. Further, on devices like an Ultrasonic sensor has two more pins which are Trigger pin and Echo pin. These pins can be defined inside the void setup() and it can further used to define the program inside void loop().
Creating a Simple Program in Arduino
The program in this part is of an ultrasonic sensor which when senses any object, it will lighten an LED and then also sounds an alarm. For this program or sketch, hardware required is any Arduino (here Arduino Uno is used), jumper cables, Ultrasonic sensor, LED, breadboard. First all the hardware needs to be assembled. There are four pins in the Ultrasonic sensor which are trigger pin, echo pin, VCC and ground. There are two pins in LED which are VCC and ground and for alarm there are two pins which are VCC and ground. After setting up all the pins, program needs to be written. The sketch is for detection of an object when it comes near the sensor.
After the assemblage of the all the hardware, the next requirement is to program the Arduino. The power to the Arduino would be supplied through laptop and also the program would be also supplied via USB. The first program is of the Ultrasonic sensor and the defined Pins are first declared below:
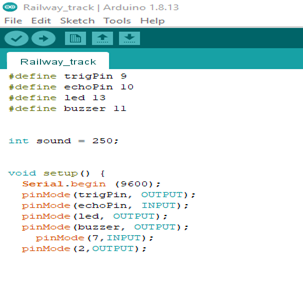
There are four pins in an Ultrasonic sensor; one sends signal, one receives it and one is for supply and last is for the ground input as shown above. A buzzer is also included which would sound when there is an obstacle. Also, an LED will also light up to give visual detection when any obstacle is detected. The code for the obstacle detection is given below:
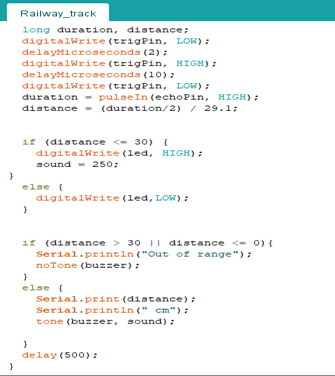
In this simple sketch, if there is any detection observed by the ultrasonic senor, the LED will lighten up and the buzzer will go of. The test is displayed in the video below:
When the hand is placed near the ultrasonic sensor, the LED glows and buzzer sounds. This simple yet effective project can be used in detecting obstructions on railway track, theft systems etc.
Conclusion
Arduino has two different components which are the programming of the Arduino and the hardware setup. There are different types of Arduino like Arduino Uno, Arduino mega, Arduino Nano and depending on the size of the project, Arduino can be chosen. Arduino are mostly used for prototype of project like Railway monitoring system, fire system, theft system etc. There are many different components which are required for a simplest of programs. Components like GPS module can give the location of where the object is located and with writing a program; proper Altitude, Latitude of the device can be known. Thus, in order to learn Arduino, both Hardware and Software side needs to be learnt.